I am the author of Meziantou.Analyzer, an open-source Roslyn analyzer that enforces good practices in terms of design and performance. This analyzer is published as a Visual Studio extension on the marketplace and as a NuGet package.
Since I regularly update this project, I want changes published quickly to the Visual Studio Marketplace and NuGet without manual effort. Manual publishing is error-prone and time-consuming, so I set up a CI/CD pipeline using Azure Pipelines. Each commit triggers the pipeline, and every commit to master automatically publishes the new version.
#Main steps of the CI/CD pipeline
The pipeline contains 2 parts: the build definition and the release definition.
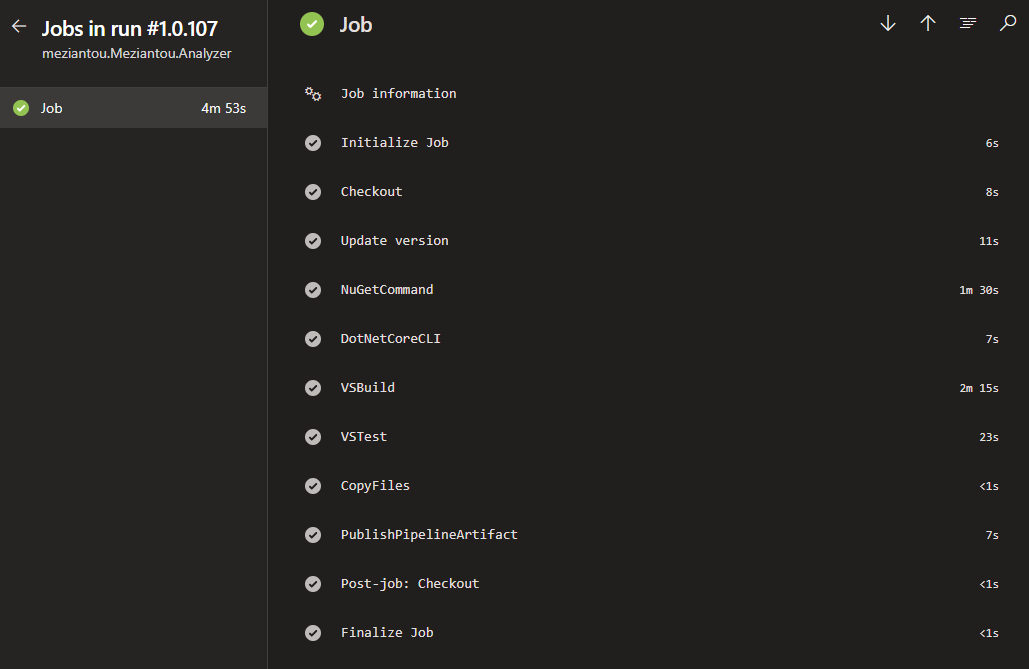
The build definition contains the following steps:
- Update the
Version attribute in the VSIX manifest - Build the project and create packages
- Run the tests
The release definition contains the following steps:
- Download the artifacts of the build pipeline
- Publish the VSIX package to the marketplace
#Project structure
We'll need some script files to build the project. Here's the final structure of my solution:
build/
├── extension-manifest.json
├── publish-vsix.ps1
└── update-version.ps1
src/
├── Meziantou.Analyzer/Meziantou.Analyzer.csproj
└── Meziantou.Analyzer.Vsix/Meziantou.Analyzer.Vsix.csproj
tests/
└── Meziantou.Analyzer.Test/Meziantou.Analyzer.Test.csproj

azure-pipelines.yml
Meziantou.Analyzer.sln
README.md
We'll see the content of the build files later.
#The build definition
The build definition is written in YAML, so it is versioned alongside the code. Create a file named azure-pipelines.yml in the root folder of the project:
YAML
trigger:
- '*' # Run the pipeline for each commit

pool:
  vmImage: 'windows-2019' # Windows Server 2019 with Visual Studio 2019

variables:
  # patch will be incremented at each build. This is useful to create a unique build version.
  patch: $[counter('VersionCounter', 0)]
  solution: '**/*.sln'
  buildPlatform: 'Any CPU'
  buildConfiguration: 'Release'
  DOTNET_SKIP_FIRST_TIME_EXPERIENCE: 1

name: 1.0.$(patch) # Set the value of $(Build.BuildNumber)

steps:
- task: PowerShell@2
  displayName: Update version in the vsix manifest
  inputs:
    filePath: 'build\update-version.ps1'
    arguments: '$(Build.BuildNumber)'
    pwsh: true

- task: NuGetCommand@2
  inputs:
    command: 'restore'

- task: VSBuild@1
  inputs:
    solution: '**\*.sln'
    maximumCpuCount: true
    platform: '$(buildPlatform)'
    configuration: '$(buildConfiguration)'

- task: VSTest@2
  inputs:
    platform: '$(buildPlatform)'
    configuration: '$(buildConfiguration)'

# Publish all needed files for the Release pipeline
- task: CopyFiles@2
  inputs:
    SourceFolder: '$(Build.SourcesDirectory)'
    Contents: |
      README.md
      build/**
      **/*.vsix
    TargetFolder: '$(Build.ArtifactStagingDirectory)'

- task: PublishPipelineArtifact@0
  inputs:
    artifactName: 'drop'
    targetPath: '$(Build.ArtifactStagingDirectory)'
Here is the content of build\update-version.ps1. This PowerShell script reads and edits the XML manifest file easily. It loads the vsixmanifest file and updates the version attribute with the build version defined in the pipeline.
PowerShell
$version = $args[0]
Write-Host "Set version: $version"

# TODO: Replace the path with the path to your vsixmanifest file
$FullPath = Resolve-Path $PSScriptRoot\..\src\Meziantou.Analyzer.Vsix\source.extension.vsixmanifest
Write-Host $FullPath
[xml]$content = Get-Content $FullPath
$content.PackageManifest.Metadata.Identity.Version = $version
$content.Save($FullPath)
If everything is working, you should now have a green build!
#The release definition
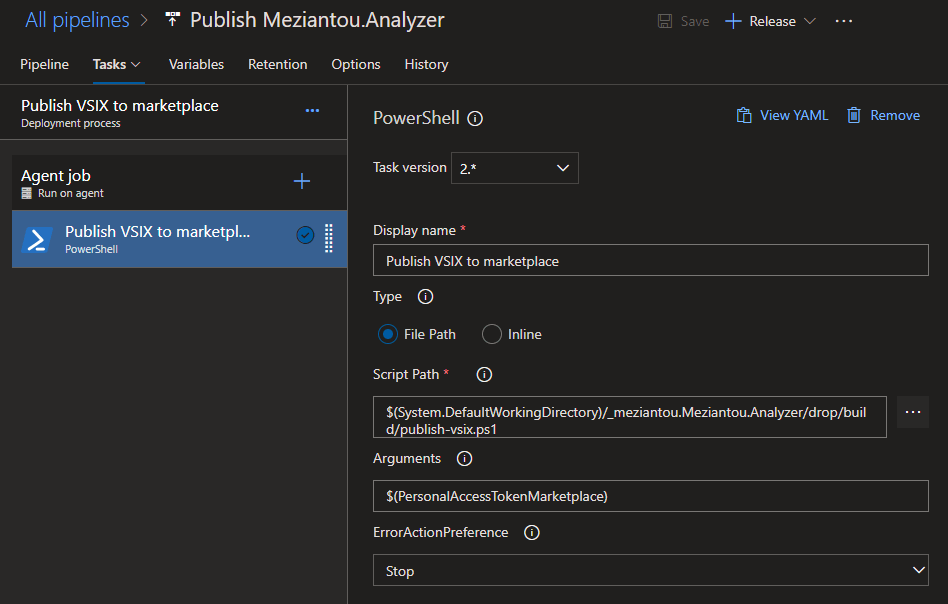
Azure Pipelines does not include a built-in task for publishing a VSIX package to the marketplace, so it must be done manually. First, locate VsixPublisher.exe on the build machine. Hard-coding the path is not recommended since Visual Studio can be installed in different locations. Instead, use vswhere to find the Visual Studio installation path, then combine it with the relative path to VsixPublisher.exe. Finally, call VsixPublisher.exe with the required arguments: the path to the VSIX, the path to the manifest file, and the Personal Access Token.
I've created a PowerShell script to handle this. Here is the content of build\publish-vsix.ps1:
PowerShell
$PersonalAccessToken = $args[0]
# TODO: Replace the path with the path to your VSIX file
$VsixPath = "$PSScriptRoot\..\src\Meziantou.Analyzer.Vsix\bin\Release\Meziantou.Analyzer.vsix"
$ManifestPath = "$PSScriptRoot\extension-manifest.json"

# Find the location of VsixPublisher
$Installation = & "${env:ProgramFiles(x86)}\Microsoft Visual Studio\Installer\vswhere.exe" -latest -prerelease -format json | ConvertFrom-Json
$Path = $Installation.installationPath

Write-Host $Path
$VsixPublisher = Join-Path -Path $Path -ChildPath "VSSDK\VisualStudioIntegration\Tools\Bin\VsixPublisher.exe" -Resolve

Write-Host $VsixPublisher

# Publish to VSIX to the marketplace
& $VsixPublisher publish -payload $VsixPath -publishManifest $ManifestPath -personalAccessToken $PersonalAccessToken -ignoreWarnings "VSIXValidatorWarning01,VSIXValidatorWarning02,VSIXValidatorWarning08"
Next, create the extension manifest file for publishing the extension. Here is the manifest for my extension (build\extension-manifest.json):
JSON
{
    "$schema": "http://json.schemastore.org/vsix-publish",
    "categories": [
        "Coding"
    ],
    "identity": {
        "internalName": "Meziantou-Analyzer",
        "tags": [
            "analyzer"
        ]
    },
    "overview": "../README.md",
    "priceCategory": "free",
    "publisher": "Meziantou",
    "private": false,
    "qna": true,
    "repo": "https://github.com/meziantou/Meziantou.Analyzer"
}
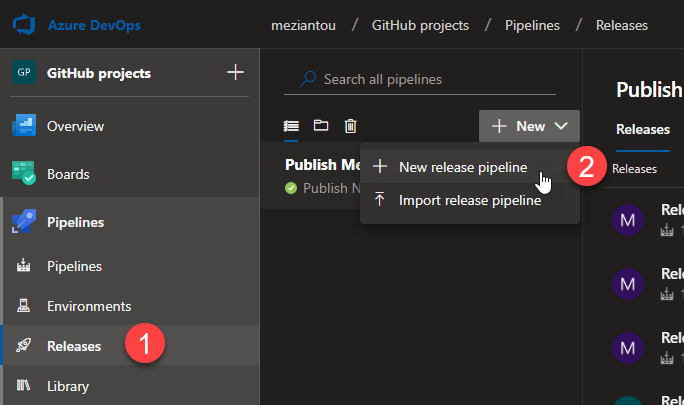
Now let's create the release definition:
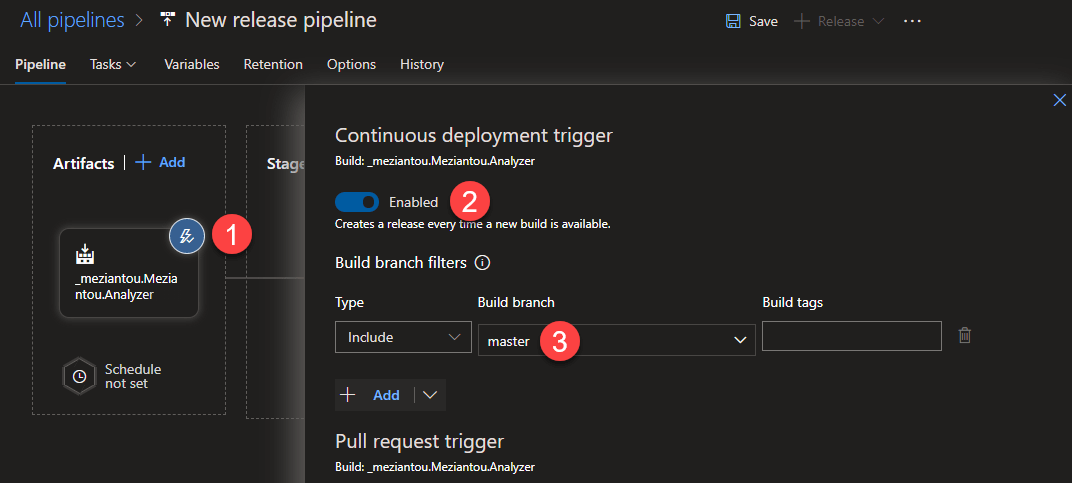
Select the empty template. Click Add an artifact and select the artifact from your build definition. Then click the trigger and enable the Continuous deployment trigger, filtering on the branch master:
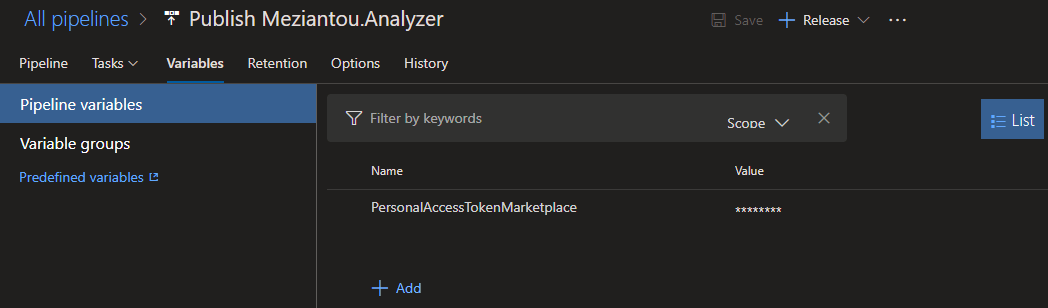
To publish an extension to the marketplace, you must authenticate using a Personal Access Token (PAT). Generate one with the required permissions as described in this documentation page for VS Code (the process is the same for a VS extension). Add the token as a secret variable in the release definition:
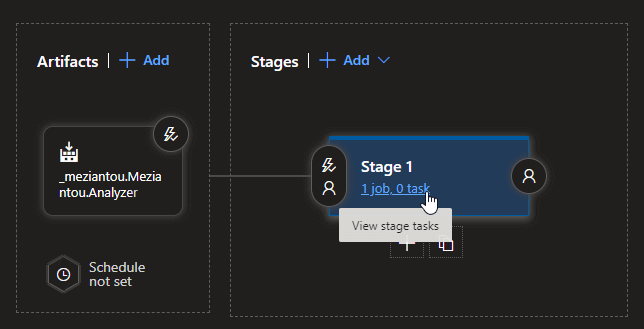
Finally, add a stage and include the PowerShell step:
Click Save. You can now click Create Release. Once the release is created, verify it works by checking its status:

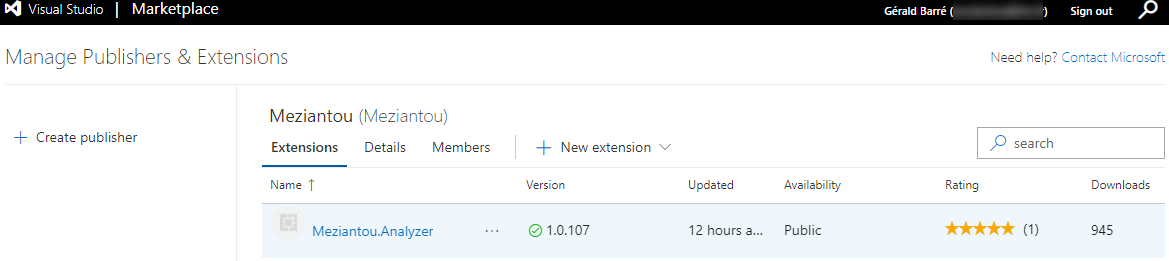
You should see the new version on the marketplace:
You can check the code of my project on GitHub: https://github.com/meziantou/Meziantou.Analyzer/tree/90a10f62578e38ee532a2af8bf305ae7af24c55c
Do you have a question or a suggestion about this post? Contact me!